Charcuterie Board: How To
Charcuterie boards are beautiful centerpieces for any dinner party — and they’re absolutely delicious. While it may seem like a challenge to know which cheeses/salami/spreads complement each other, this post will help break down what to look for and how to assemble your own board.
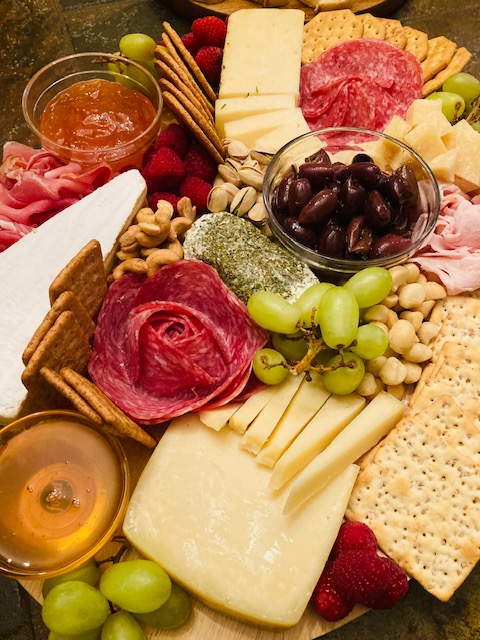
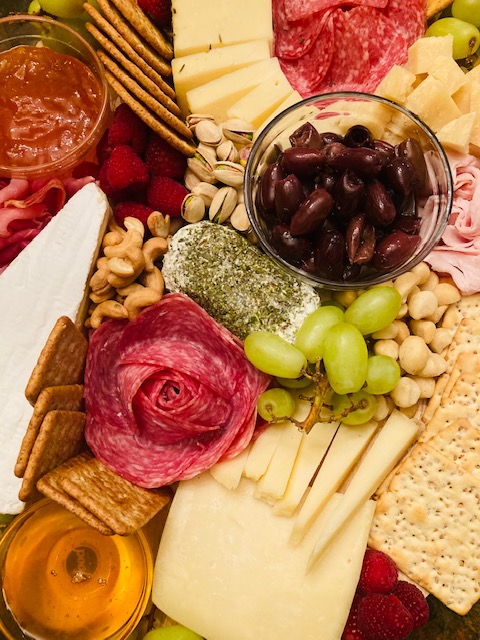
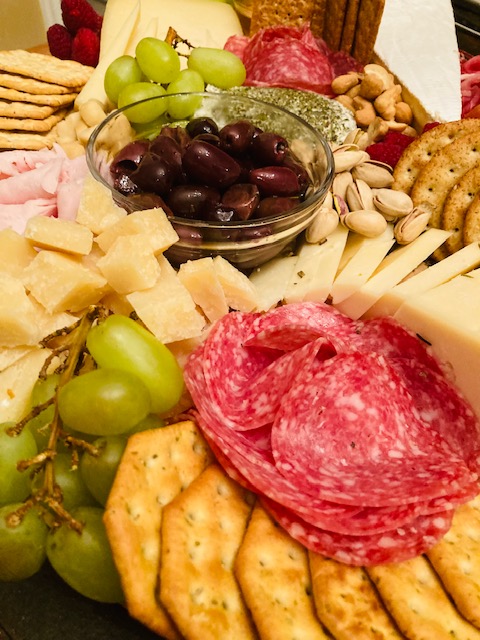
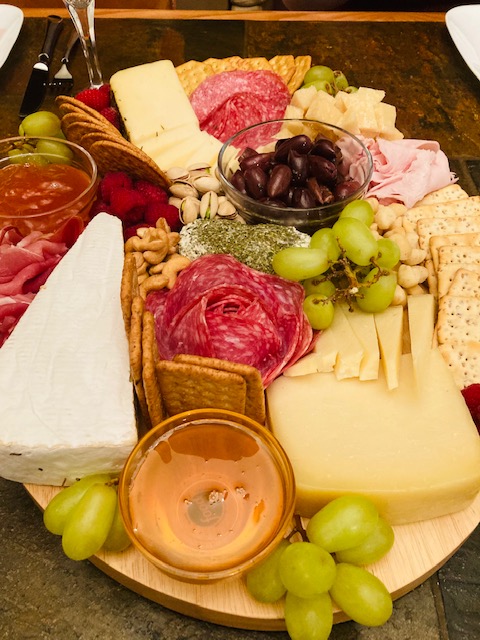
The charcuterie board I have pictured and will describe is only one variation of a thousand different possible boards you could make, it is truly limited to your imagination and desire. This one is classic and pretty simple!
The most important concept with charcuterie boards is variety. If you’re making it for a party, you have no idea who might like what. That’s why it’s important to have a variety of cheeses, meats, and other ingredients for even the pickiest eaters.
Cheeses
You want to make sure to have a mix between soft and hard cheese, mild and more flavorful cheeses. The safest place to start is with brie or camembert. They are almost always crowd-pleasers, especially if you buy high-quality ones. I get my brie from Trader Joe’s (same for every cheese in this list), and I like the one with the french flag on it (triple cream of course).
Another great option for a soft cheese to include is goat cheese (I like the herb-covered one).
Then, switch to the hard cheeses. Parmesan is a great choice and pretty mild, so most people will enjoy it. I also like gouda and asiago cheese for my board! If you know people will like it, you can certainly get a moldy cheese as well.
Salami
I like to go for a mix of smoked and cured salamis for my board. I love the Columbus Italian Dry Salame, so I included that one. I also got a smoked applewood salami which was good, as well as the classic prosciutto. The best sign of quality salami is if they are made in Europe, they are almost always tasty.
I also included some roast turkey on my board for people who don’t eat pork, feel free to do the same or omit it.
Spreads and Crackers
For spreads, I usually lean towards sweet rather than savory because they complement the salty cheeses best! I chose honey and peach jam, but apricot jam would also be delicious.
I like to add a variety of crackers: some that are herby/seasoned, some that have seeds, and some that are just plain. Aesthetically, it’s pretty to have different colors, shapes, and sizes. I bought a set of six different types of crackers for pretty cheap at Aldi’s!
Other Ingredients (fillers)
I like to call these ingredients fillers because they fill up any leftover space on the board after you’ve layered on the cheeses, meats, spreads, and crackers. These can be anything ranging from olives to fruits to nuts to sprigs of fresh herbs.
I included kalamata olives, grapes, raspberries, cashews, pistachios, and macadamia nuts. Use whatever you have/like!

Now that I’ve broken down each of the categories, here is a universal ingredient list:
- 3-4 types of cheeses
- 3-4 types of salami/meat
- 3-4 types of crackers
- honey
- jam of choice
- olives
- 2-3 types of nuts
- grapes
- berries
And an equipment list:
- large wooden board
- wine glass (to optionally form the salami roses)
- small bowls for spreads and olives
- cheese knives (not pictured)
Instructions
- Start with the cheeses. For the hard cheeses, cut about half of each cheese into slices. Leave the soft cheeses whole. Arrange the cheeses on the wooden board.
- Then place the small bowls on the board, filling them with whatever you want. Essentially, you want to start with the bigger components and then fill in the spaces with other ingredients.
- Arrange the salamis/meats on the board, making roses if you wish. You can use a wine glass for this (there are plenty of tutorials online).
- Then arrange the crackers and fill in any spaces with the other ingredients: nuts, grapes, berries, etc. Enjoy!
Check out some of my other appetizer recipes here, such as my easy avocado deviled eggs, mozzarella pesto appetizers, bruschetta, and more!